The .gov means it's official. Official North Dakota websites will end in .gov. Before sharing sensitive information, make sure you're on a government site.
The site is secure. The https:// ensures that you're connecting to the official website and that any information you provide is encrypted and sent securely.
Go to the Program Reporting System (PRS) link (Or, if you have already added PRS to your Favorites, go there and skip Step 3. Otherwise, continue to Step 2.)
Add the PRS link to your Favorites.
Log in to PRS with your login ID and password.
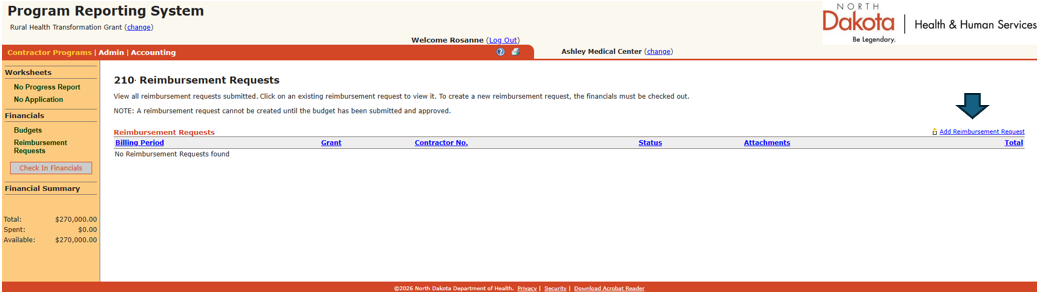
Click on the Reimbursement Requests link. Be sure you are on the Contractor Programs tab. If you are not, click Contractor Programs.
Click on the Check Out Financials button.
Click the Add Reimbursement Request link on the right side of your screen.
Click on the drop-down menu, then click the grant name for which you want to complete a reimbursement request.
Click on the Save button.
On the pop-up calendar, select the date through which costs are being claimed. For example, if costs are being claimed through June 30, YYYY, select June 30, YYYY. The billing period end date may not exceed the contract end date.
Complete the form.
Click on the Save button on bottom of page.
If you need to attach a document to the reimbursement request, click on the Attachments link located above the Percentage Spent column. Click on the Add Attachment button, then click on the Brow button to locate the document. Select the document and click Open. Click Ok. Repeat this step until all documents have been added.
If you need to delete an attachment, click the Attachments link above the Percentage Spent column. Click the trash can icon to remove the attachment. When a message asks if you want to delete the attachment, click OK.
When you are ready to submit the reimbursement request, click on the Submit button.
If no validation errors are shown, the screen will indicate the reimbursement request was submitted. If validation errors are shown, go to the sections noted and complete the required information. Once the errors are corrected, return to step 11.
Click the Check In Financials button.
If you want a printout, click on the printer icon located next to the question mark icon. Note: A copy of the report is stored in PRS and may be accessed at any time.
Click on the Log Out link next to your name to exit PRS.
To access a Reimbursement Request
Log into PRS.
Click on the Reimbursement Requests link. If the link is not shown, click All Programs on the left side, then click Reimbursement Requests.
Click on a date hyperlink under the Billing Period column to access the reimbursement request.
When finished, click the Log Out link next to your name to exit PRS.